Home Improvement

Essential gardening tools for beginners

Top 12 Essential Gardening Tools for Beginners

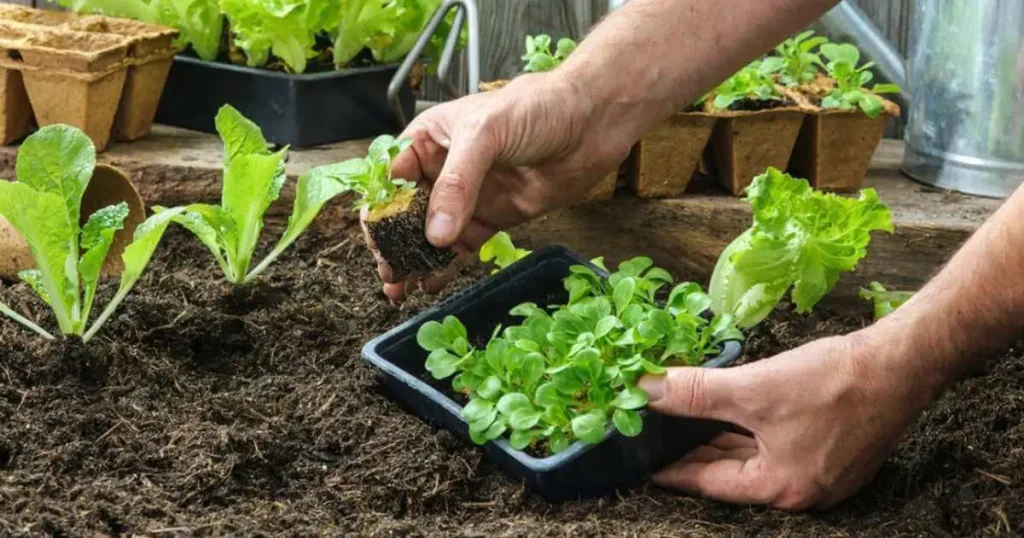
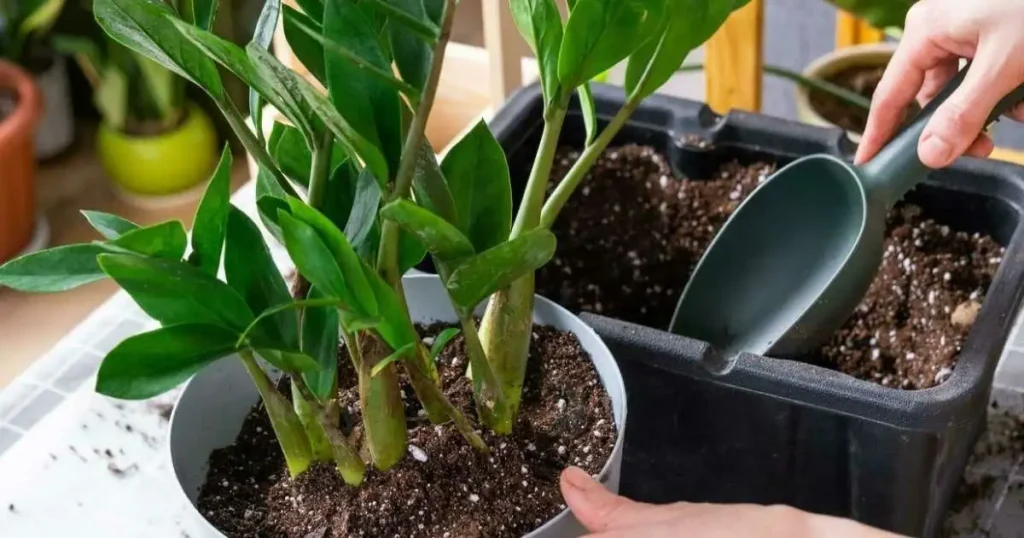
Have you ever dreamed of having your own beautiful garden but felt overwhelmed by where to start? Gardening can be both joyful and challenging, especially for beginners. Having the right garden tools is crucial for beginners. The right tools make gardening easier, more efficient, and enjoyable. They help you plant, prune, and maintain your garden with less effort and better results. In this article, we will introduce you to 12 essential gardening tools for beginners. We will explain what each tool is, how to use it, and provide tips on choosing the best one. By the end, you will have a clear understanding of the basic tools needed to start your gardening journey. Essential Gardening Tools for Beginners 1. Hand Trowel A hand trowel is a small, handheld tool with a pointed, scoop-shaped metal blade and a handle. It is used for digging small holes, planting seeds and bulbs, and transplanting small plants. The hand trowel is essential for any gardener. It helps you dig precise holes for planting, making it easier to place seeds and plants exactly where you want them. It’s perfect for working in small spaces like flower pots or garden beds. Tips for Choosing the Right Hand Trowel When choosing a hand trowel, look for one made of durable materials like stainless steel or high-quality aluminum. These materials resist rust and last longer. The handle should be comfortable to hold, preferably with a soft grip to prevent slipping. Handles made from wood, plastic, or rubber are all good options. Make sure it feels good in your hand and is easy to use for extended periods. By having the right hand trowel, you’ll make your gardening tasks easier and more enjoyable. This tool will become one of your best friends in the garden, helping you create a beautiful and thriving space. 2. Garden Gloves Garden gloves protect your hands from dirt, thorns, and rough surfaces. They act like a barrier, keeping your skin clean and safe while you work. Wearing garden gloves helps prevent blisters and cuts. When you handle tools or pull weeds, gloves provide a cushion that stops your skin from getting sore or injured. Tips for Choosing the Right Garden Gloves Choose garden gloves that fit well. They should be snug but not too tight, so you can move your fingers easily. Look for gloves made of durable materials like leather or synthetic fabric. Some gloves are waterproof, which is great if you work with wet soil. Always pick gloves that feel comfortable and provide good protection. 3. Pruning Shears Hand pruners, also known as pruning shears or secateurs, are essential for maintaining plant health and achieving a well-groomed garden. Hand pruners are sharp, scissor-like tools used for cutting branches, stems, and foliage. They are designed to make precise cuts, promoting healthy growth by removing dead or overgrown parts of plants. Hand pruners come in various sizes and styles, including bypass pruners for clean cuts and anvil pruners for thicker branches. Tips for Choosing the Right Pruning Shears When choosing hand pruners, focus on blade quality and handle comfort. Look for sharp, high-quality blades that can make clean cuts without crushing the plant tissue. Ergonomic handles with non-slip grips are also important, as they reduce hand fatigue and improve control while pruning. 4. Garden Fork A garden fork is a tool with several long, sturdy tines (prongs) that are perfect for loosening, lifting, and turning soil. It’s essential for aerating soil, which helps plants grow better by allowing air, water, and nutrients to reach the roots more easily. Garden forks are also great for breaking up clumps of dirt, mixing compost into the soil, and removing weeds. Tips for Choosing the Right Garden Fork When choosing a garden fork, consider these factors: 5. Watering Can A watering can is a container with a spout, used for watering plants. It helps you control the flow of water, making it easy to give your plants the right amount of moisture without drowning them. Watering cans are handy for reaching plants that a hose might not reach and are great for indoor and outdoor gardening. Tips for Choosing the Right Watering Can When selecting a watering can, keep these tips in mind: 6. Garden Hoe A garden hoe is a tool with a long handle and a flat blade. It’s used for weeding and cultivating the soil. Weeding means removing unwanted plants that can take nutrients away from your garden plants. Cultivating the soil helps prepare it for planting by breaking up the surface and making it loose and airy. This is important because it allows plant roots to grow more easily and helps water and nutrients reach the roots. Tips for Choosing the Right Garden Hoe When picking a garden hoe, consider the blade type and handle length. There are different types of hoe blades. Some are flat and wide, perfect for chopping weeds. Others are narrow and pointed, great for getting between plants without damaging them. Choose the blade type based on your garden needs. The handle length is also important. A longer handle can help you reach further and work while standing upright, reducing back strain. However, a shorter handle might give you more control for detailed work. Pick a handle length that feels comfortable for you. 7. Rake A rake is a tool with a long handle and a row of tines (prongs) at the end. It’s used for leveling soil and removing debris like leaves, sticks, and rocks from your garden. Raking helps keep your garden tidy and prepares the soil for planting by making it smooth and even. This is important for seed germination and proper plant growth. Tips for Choosing the Right Rake When choosing a rake, think about the type of rake and the material it’s made from. Type of Rake There are different rakes for different tasks. A leaf rake has flexible, fan-shaped tines, perfect for gathering leaves and light debris. A soil rake, also known as a bow rake, has

Top 12 Essential Gardening Tools for Beginners Read More »

Home Gardening Tips for beginners

Top Gardening Tips for Beginners in 2024

Gardening is more than just a hobby; it’s a fantastic way to improve both your mental and physical health. Tending to plants can reduce stress, boost your mood, and even give you a good workout. Plus, growing your own fruits and vegetables means fresher, healthier food on your plate. In this guide, you’ll learn the essential gardening tips for beginners. We’ll cover everything from understanding your climate zone to choosing the right plants and preparing your garden. By the end, you’ll have the knowledge to start your garden with confidence in 2024. Getting Started with Gardening Before planting anything, you need to know your climate zone. This is important because different plants grow best in different areas. The USDA Hardiness Zones map shows which plants can thrive in your region. Explanation of USDA Hardiness Zones The USDA Hardiness Zones are regions defined by their minimum winter temperatures. Each zone is divided into 10°F increments. For example, Zone 7 has average minimum temperatures between 0°F and 10°F. You can find your zone by entering your zip code on the USDA Hardiness Zone Map website. Knowing your zone helps you choose plants that will survive the winter in your area. Choosing the Right Plants Some plants are easier to grow than others, especially for beginners. Try growing vegetables like tomatoes, lettuce, and carrots. Herbs like basil, mint, and parsley are also great choices. For flowers, consider marigolds, sunflowers, and zinnias. Factors to Consider When choosing plants, think about how much sunlight your garden gets. Some plants need full sun, while others prefer shade. Also, consider how much water your plants will need. Most plants need regular watering, but some, like succulents, need less. Finally, check the soil in your garden. Is it sandy, clay, or loamy? Different plants prefer different types of soil. Adding compost can improve soil quality and help your plants grow better. Essential Gardening Tools Starting a garden requires some basic tools to make the job easier and more fun. Here are the essential tools every beginner gardener needs: Preparing Your Garden Choosing the right spot for your garden is crucial. Here’s what to consider: Soil Preparation Good soil is the foundation of a healthy garden. Here’s how to prepare it: Creating a Garden Plan Planning your garden layout helps make the most of your space. Here are some tips: Planting Basics Once you’ve planned your garden, it’s time to start planting. Planting and caring for your plants is essential to ensure that they thrive. When planting, make sure to follow the instructions on the seed packet or plant label. This will ensure that you plant your seeds or seedlings at the correct depth and spacing. After planting, make sure to water your plants regularly. The frequency of watering will depend on the type of plant and the weather conditions. It’s essential to check the soil moisture by inserting your finger into the soil up to the first knuckle. If the soil feels dry, it’s time to water. You should also fertilize your plants regularly. Fertilizers provide essential nutrients that plants need to grow. You can purchase fertilizers at your local nursery or online. Planting Techniques Proper Planting Depth and Spacing Planting Depth Spacing Watering Tips for New Plants Gardening Maintenance Watering Strategies How Often and How Much to Water Watering Methods Weed Control Mulching Techniques Natural Weed Control Methods Pest Management Pests can be a significant problem in gardens, especially for beginners. Monitor your plants regularly for signs of pests, such as holes in leaves or stems. Identifying Common Garden Pests Organic Pest Control Solutions Make Use of Compost Composting is an excellent way to turn kitchen waste into a nutrient-rich soil amendment. Here are some tips to help you make use of compost: Seasonal Gardening Tips Spring Gardening Tips Spring is the perfect time to start gardening. First, clean your garden by removing dead leaves and weeds. Next, check the soil. Add compost to make it rich and ready for planting. Also, sharpen your gardening tools to ensure they’re in good condition. Start by planting seeds indoors. Vegetables like tomatoes, peppers, and cucumbers grow well when you start them inside. Once the weather warms up, move them outside. You can also plant flowers like marigolds and petunias to add color to your garden. Summer Gardening Tips Summer can be harsh on plants because of the heat. Water your garden early or late in the evening to avoid evaporation. Mulch around your plants to keep the soil moist. Choose drought-resistant plants like lavender and succulents to make gardening easier. Summer is the time to enjoy the fruits of your labor. Pick vegetables like tomatoes, cucumbers, and beans when they’re ripe. Harvest regularly to encourage more growth. Pick fruits like strawberries as soon as they are entirely red and juicy. Fall Gardening Tips Fall is the time to get your garden ready for the cold. Start by cleaning up dead plants and fallen leaves. Plant cover crops like clover or rye to protect the soil. Also, consider adding a layer of mulch to insulate your plants from the winter chill. Some plants thrive in cooler weather. Try planting vegetables like spinach, kale, and garlic in the fall. Flowers like pansies and mums can add color to your garden even when the weather cools. These plants will grow well into the early winter. Winter Gardening Tips Winter doesn’t mean you have to stop gardening. You can grow herbs like basil, parsley, and mint indoors. Use pots with good drainage and place them near a sunny window. You can also try growing small vegetables like lettuce and radishes in containers inside your home. Winter is the perfect time to care for your gardening tools. Clean them thoroughly to remove dirt and rust. Sharpen blades and oil moving parts to keep them in good condition. Store tools in a dry place to prevent moisture damage. Starting Small and Harvesting As a beginner, it’s essential to start small and gradually expand your

Top Gardening Tips for Beginners in 2024 Read More »

peace lily plant-how to grow and care for peace lily

How To Grow And Care For Peace Lily

Peace lilies, scientifically known as Spathiphyllum, are popular indoor plants cherished for their elegant, glossy green leaves and striking white flowers. They belong to the Araceae family and are native to tropical regions, particularly Central and South America. Peace lilies are well-known for their air-purifying qualities, enhancing both the beauty of indoor spaces and the air quality. These plants are characterized by their deep green foliage and distinctive flower structure. The flowers consist of a white spathe surrounding a spadix containing the actual flowers. Peace lilies are easy to care for, making them perfect for new gardeners or those with minimal gardening knowledge. Types of Peace Lilies 1. S.‘Mauna Loa Supreme’: Known for its large, showy flowers and robust growth. 2. Spathiphyllum ‘Power Petite’: A compact variety for smaller spaces or containers. 3. S.’Golden Delicious’: Features golden-yellow variegated leaves, adding a touch of color. 4. S.‘Sensation’: Recognized for its striking, elongated leaves and prolific blooms. 5. S. ‘Starlight’: Offers variegated foliage with creamy-white and green patterns. 6. S.’Mojo’: A petite variety with charming, petite flowers perfect for tabletop displays. Peace Lily Care Soil Requirements Peace lilies thrive in well-draining, peat-based potting mixtures. The soil should be rich in organic matter to provide essential nutrients for healthy growth. Use well-draining soil and avoid heavy soils or those that retain too much water, as they can cause root rot and other problems. Light Conditions Peace lilies like bright, indirect light but can also handle low-light areas. Position them near windows with sheer curtains or in well-lit rooms without direct sunlight. Excessive sun can burn their leaves, so finding the right light balance is critical for healthy growth. Watering Watering is crucial to caring for Peace Lily plants, ensuring they thrive and stay healthy. Peace Lilies prefer slightly moist soil but can suffer from overwatering. It’s essential to strike a balance by watering them moderately and allowing the soil to dry somewhat between waterings. A good rule of thumb is to water your Peace Lily when the top inch of soil feels dry. When watering, use room temperature water to avoid shocking the plant. Pour the water evenly around the plant’s base, ensuring it reaches the roots. Avoid waterlogging the soil, leading to root rot and other issues. Humidity Levels Peace Lilies do well in moderately humid to humid conditions, ideally between 40% and 60% humidity. You can boost humidity for your Peace Lily by placing a tray filled with water and pebbles nearby or using a humidifier in the room. Maintaining proper humidity levels helps prevent issues like dry, brown leaf tips and promotes lush, healthy foliage. Regular misting can also help boost humidity around the plant, especially during dry seasons or in centrally heated or air-conditioned rooms. Temperature Considerations for Peace Lily Plants Temperature plays a significant role in the growth and well-being of Peace Lilies. Peace Lilies prefer temperatures typically found in indoor rooms, between 65°F to 80°F (18°C to 27°C). They don’t like sudden temperature changes, so keep them away from drafty windows or vents that blow hot or cold air. During colder months, protect your Peace Lily from cold drafts and maintain a consistent temperature to avoid stress on the plant. Similarly, keep them away from direct sunlight in hot climates to prevent heat stress. Temperature directly impacts the growth rate and overall health of Peace Lilies. Warmer temperatures promote faster growth and blooming, while cooler temperatures can slow growth and reduce flowering. Extreme temperatures can cause leaf damage, such as brown spots or wilting. Monitoring the temperature and providing a stable, comfortable environment can encourage robust growth and vibrant blooms in your Peace Lily. Fertilizing Peace Lilies Fertilizing your Peace Lily is crucial for maintaining its vibrant green foliage and promoting beautiful blooms. Peace Lilies benefit from balanced, water-soluble fertilizers designed for houseplants. Choose a balanced fertilizer with equal parts nitrogen, phosphorus, and potassium (N-P-K ratio of 20-20-20 or similar).  Dilute the fertilizer to half its strength to prevent overfeeding. Apply it to the soil every 4-6 weeks in spring and summer, which is the growing season. During the active growing months, which coincide with warmer temperatures and increased sunlight, your Peace Lily will appreciate regular feeding. However, reduce or stop fertilizing during the dormant phase in fall and winter when growth slows. Always check the soil moisture before fertilizing to avoid nutrient buildup or root damage. Drainage Peace Lilies need good drainage for healthy growth to avoid waterlogging and root rot. Use pots with drainage holes and well-draining potting soil. When transplanting, opt for a slightly bigger pot to accommodate growing roots. Loosen the root ball gently during transplanting to promote vigorous root growth in the new soil. Proper drainage allows excess water to escape, preventing waterlogged soil that can suffocate roots. It also helps nutrient absorption and reduces the risk of fungal diseases caused by overly moist conditions. Maintain a balance between watering and drainage to keep your Peace Lily thriving. Transplanting Guidelines for Healthy Growth  Transplant your Peace Lily every 1-2 years or when it outgrows its current pot. Choose a pot that is 1-2 inches larger in diameter and has adequate drainage. Carefully remove the plant from its old pot, gently loosen tangled roots, and place it in the new pot with fresh potting mix. Water thoroughly after transplanting and monitor the plant for any signs of stress. Blooming and Bloom Care Several factors play a crucial role in the blooming of Peace Lilies. Understanding these factors can help you create the optimal environment for vibrant blooms: 1. Light Exposure: Peace Lilies thrive in indirect sunlight. Too much direct sunlight can scorch their leaves, while insufficient light may lead to fewer blooms. 2. Temperature: Maintain a moderate temperature range, ideally between 65°F to 80°F (18°C to 27°C). Extremes in temperature can hinder blooming. 3. Watering: Adequate watering is essential. Overwatering or underwatering can stress the plant, affecting its ability to produce blooms. 4. Humidity Levels: Peace Lilies prefer high humidity. A pebble tray or humidifier can help create a humid environment, promoting blooming. 5. Nutrient Balance: Proper fertilization with a balanced fertilizer during the growing season supports healthy blooms. Avoid over-fertilizing, as it can lead to salt buildup and damage the plant. Propagating Peace Lilies Peace lilies, known for

How To Grow And Care For Peace Lily Read More »

zz plant- propagate zz plant

3 Effective Ways to Propagate ZZ Plant(Step-By-Step Guide)

ZZ plants, scientifically known as Zamioculcas Zamiifolia, are popular indoor plants valued for their attractive foliage and easy maintenance. These plants are native to Eastern Africa and belong to the Araceae family. One of the critical attractions of ZZ plants is their ability to be propagated easily, allowing plant enthusiasts to expand their collection or share these plants with others. Propagation refers to the process of creating new plants from existing ones. With ZZ plants, propagation can be done through various methods such as stem cuttings, leaf cuttings, and division. Each method has its requirements and procedures, making it accessible for beginner and experienced gardeners. When to Propagate ZZ Plant The best time to propagate ZZ plant is during the spring and summer months when the plant is actively growing. This period provides optimal conditions for developing new roots and propagating plants’ growth. Avoid propagating ZZ plant during the dormant winter months, as they may not root as successfully. What You’ll Need Required Equipment and Tools Necessary Materials How to Propagate ZZ Plant From Stem Cutting Propagating ZZ plants through stem cuttings is a straightforward and rewarding method that allows you to create new plants from healthy stems. Here’s a step-by-step guide on how to propagate ZZ plant using stem cuttings: 1. Taking Stem Cuttings To begin with, select a healthy ZZ plant with strong stems for cutting. Using sharp, clean scissors or pruning shears, cut a stem that is at least 6 inches long. Ensure that the stem has several healthy leaves and nodes, the points where roots will form. 2. Placing Cuttings in Water After taking the stem cuttings: 3. Repotting with Developed Roots After a few weeks, you will notice roots starting to grow from the nodes of the stem cuttings. Once the roots are about 1-2 inches long and well-developed, it’s time to repot the cuttings. Choose a small pot with well-draining soil suitable for ZZ plants. Gently remove the cuttings from the water and plant them in the soil, ensuring the roots are covered and the stem stable. Water the newly potted cuttings lightly to settle the soil around the roots. Benefits of Stem Cutting Propagation Stem-cutting propagation offers several advantages for ZZ plant enthusiasts. It allows you to create multiple plants from a single healthy specimen, ensuring a steady supply of these beautiful plants for your home or garden. Additionally, propagating ZZ plants through stem cuttings is relatively easy and doesn’t require specialized equipment, making it accessible to beginners and experienced gardeners alike. How to Propagate ZZ Plant From Leaf Cutting Propagation of ZZ plants through leaf cuttings is a simple yet effective method. Here’s a detailed guide on how to do it: Taking Leaf Cuttings To start: Planting Cuttings in Soil After taking the leaf cuttings, allow them to dry and callus for a day or two. This step helps prevent rotting when planted in soil. Once the cut ends have been calloused, prepare a pot with a well-draining potting mix. Make small holes in the soil and gently insert the leaf cuttings, ensuring that at least one node (where roots will grow) is below the soil surface. Watering Guidelines After planting the leaf cuttings, water the soil lightly to settle it around the cuttings. Be careful not to overwater, as soggy soil can lead to rot. Keep the soil lightly moist but not wet throughout the propagation process. You can use a spray bottle to mist the soil occasionally to maintain humidity around the cuttings. Care Tips for Leaf Cuttings How to Propagate ZZ Plant From Division The division is a reliable method for propagating ZZ plants. It allows you to create new plants from existing ones. This section will guide you through the process, ensuring a successful propagation experience. Removing the Plant from its Pot The first step in division propagation is carefully removing the ZZ plant from its pot. Choose a healthy and mature plant for division. Gently tip the pot to one side, supporting the base of the plant as you ease it out. Avoid pulling on the stems or leaves to prevent damage. Dividing Clumps of Rhizomes Once the plant is out of the pot, inspect the root system. ZZ plants grow from rhizomes, thick, fleshy stems that store water and nutrients. You’ll notice clumps of rhizomes connected. Carefully divide these clumps into sections using a clean and sharp knife or gardening shears. Each section should have at least one healthy rhizome and a few leaves attached. Repotting New Plants After dividing the rhizomes, it’s time to repot the new plants. Choose containers slightly larger than the divided sections to allow room for growth. Fill the pots with a well-draining potting mix, preferably a mix designed for succulents or cacti. Plant each divided section in its pot, ensuring the rhizome is covered with soil and the leaves are above the soil line. Why Division Propagation Works Division propagation works well for ZZ plants because it allows you to create multiple plants from a single mature plant. Each new plant retains the genetic characteristics of the parent plant, ensuring uniformity in appearance and growth patterns. This method is beneficial for rejuvenating overcrowded or leggy ZZ plants. Care Tips for Newly Divided ZZ Plants After repotting the new plants, please provide proper care to encourage healthy growth. Place the pots in a location with bright, indirect light, as direct sunlight can scorch the leaves. Water the plants sparingly, allowing the soil to dry out slightly between waterings. ZZ plants are drought-tolerant and prefer to dry out between waterings rather than staying constantly moist. Can I Propagate a ZZ Plant? Suitability for Propagation ZZ plants are popular houseplants due to their low maintenance and resilience. They can be propagated successfully, making them a favorite among plant enthusiasts looking to expand their collection or share plants with friends. Propagation is generally straightforward with ZZ plants, making them suitable candidates for beginners and experienced gardeners. Tips for Successful Propagation 1.   Choose Healthy Plants: Start with a healthy ZZ plant showing no disease or stress signs. Healthy plants are more likely to propagate successfully. 2.   Use Sharp Tools: When

3 Effective Ways to Propagate ZZ Plant(Step-By-Step Guide) Read More »

Lemongrass in the garden-Grow And Care For Lemongrass

How To Grow And Care For Lemongrass

Lemongrass, scientifically known as Cymbopogon citratus, is a versatile and aromatic herb widely used in culinary dishes, herbal teas, and natural remedies. Its refreshing citrus scent and tangy flavor make it a favorite in Asian cuisines, especially Thai and Vietnamese dishes. Besides its culinary uses, lemongrass is valued for its medicinal properties, including its ability to aid digestion, relieve stress, and reduce inflammation. When it comes to growing and caring for lemongrass, understanding its origins and characteristics is essential. Lemongrass is native to tropical regions like Southeast Asia, where it thrives in warm climates with plenty of sunlight. Its tall, slender stalks and long, blade-like leaves make it a distinctive addition to any garden or herb collection. Growing Lemongrass Growing From Seed  If you want to grow lemongrass from seed, it can be a satisfying experience, but it requires patience and attention to detail. First, get high-quality lemongrass seeds from a trusted supplier or harvest them from mature plants. To grow your seeds successfully, plant them in soil that drains well. Keep the soil moist consistently until germination occurs, which usually takes two to three weeks. After your seedlings have grown a few inches tall, transferring them into larger pots or planting them directly into the ground is best. Make sure to give them enough space to spread out as they mature. Purchasing Lemongrass Plants  Purchasing established lemongrass plants is a convenient option for those who prefer a quicker start. Look for healthy plants with vibrant green leaves and strong, upright stalks. Choose a variety that suits your climate and growing conditions, as lemongrass comes in several cultivars with varying cold tolerance levels. When planting purchased lemongrass, ensure the soil is well-drained and enriched with organic matter. Water the plants regularly, especially during dry spells, and provide adequate sunlight to promote healthy growth. Transplanting Lemongrass Plants  Transplanting lemongrass plants is straightforward but requires careful handling to avoid damaging the roots. Choose a sunny location with well-draining soil for transplanting, and dig a hole slightly larger than the plant’s root ball. Gently remove the plant from its container, being mindful not to disturb the roots excessively. Place the plant in the hole and backfill it with soil, firming it gently around the base of the plant. Water thoroughly after transplanting to help the roots establish in their new location. By following these tips for growing lemongrass from seed, You can enjoy a thriving lemongrass garden that provides fresh herbs for cooking and wellness by purchasing healthy plants and transplanting them effectively. Caring for Lemongrass When caring for your lemongrass plant, there are several key aspects to keep in mind to ensure its health and vitality. Let’s delve into each of these aspects in detail: Watering Proper watering is crucial for the well-being of your lemongrass. Aim to keep the soil consistently moist but not waterlogged. Water your lemongrass deeply, allowing the water to penetrate the roots. It’s best to water in the morning to avoid excess moisture at night, which can lead to fungal issues. Light Requirements Lemongrass thrives in full sun, so providing it with at least 6-8 hours of direct sunlight daily is essential. Ensure that your lemongrass plant is placed where it receives ample sunlight throughout the day. Insufficient light can result in leggy growth and diminished flavor. Soil Conditions Lemongrass prefers well-draining soil with a slightly acidic to neutral pH level. A sandy loam soil enriched with organic matter is ideal for optimal growth. Avoid heavy clay soils that retain too much water, leading to root rot. Regularly check the soil moisture and adjust watering to maintain proper soil conditions. Fertilizing To promote healthy growth and robust flavor, fertilize your lemongrass plant during the growing season. Use a balanced, slow-release fertilizer or organic compost to provide essential nutrients. Apply fertilizer sparingly to prevent overfeeding, which can cause excessive foliage growth at the expense of flavor concentration. Pruning Techniques Regular pruning is essential for maintaining a compact and productive lemongrass plant. Remove dead or yellowing leaves to encourage new growth and prevent the spread of diseases. Trim back overgrown stems to promote bushier growth and enhance the overall appearance of your plant. Pruning also helps maintain airflow and reduce the risk of pest infestations. By paying attention to these key aspects of caring for your lemongrass plant—proper watering, adequate light, optimal soil conditions, strategic fertilizing, and regular pruning—you can ensure that your plant thrives and continues to delight you with its refreshing citrus aroma and flavor. Common Problems and Solutions Dealing with Mold Mold can be a pesky issue for lemongrass plants, especially in humid environments. To tackle mold effectively, start by ensuring proper airflow around your plants. Trim any overcrowded areas to allow for better ventilation, reducing the moisture that mold thrives on. Additionally, avoid overwatering, as excess moisture can encourage mold growth. If you notice mold on your lemongrass, gently wipe affected areas with a damp cloth and consider applying a natural fungicide like neem oil or a mixture of baking soda and water to prevent further spread. Addressing White Spots White spots on lemongrass leaves can indicate various problems, including fungal infections or pest infestations. To address white spots, inspect your plants regularly for signs of pests such as aphids or mealybugs. Remove any affected leaves and treat the remaining foliage with insecticidal soap or neem oil to deter pests. If white spots persist, consider adjusting your watering schedule to avoid water sitting on leaves, as this can create conditions favorable for fungal growth. Managing Brown, Droopy Leaves Brown, droopy leaves on lemongrass often indicate inadequate watering or nutrient deficiencies. Check the soil moisture regularly and water your plants deeply when the top inch of soil feels dry. Ensure proper drainage to prevent waterlogged roots, which can lead to root rot and drooping leaves. If nutrient deficiencies are suspected, consider fertilizing your plants with a balanced fertilizer formulated for herbs. Trim any severely damaged leaves to encourage new growth and overall plant health. Preventing

How To Grow And Care For Lemongrass Read More »

zz plant repotting-The Complete Guide to Repot ZZ Plant

The Complete Guide to Repot ZZ Plant

The trusty ZZ plant, known as Zamioculcas Zamiifolia, has become the perfect houseplant for brown thumbs and busy schedules. Its hardy nature and low-light tolerance make it ideal for almost any indoor environment. But even the most rigid plant needs a little love, and understanding when and how to repot ZZ plant can be crucial to keeping it thriving. In this comprehensive guide, we’ll take you through all the steps to ensure your ZZ enjoys a successful repotting — from recognizing the signs that it’s time to make a move to selecting the right potting mix and the best practices for the process. Understanding Your ZZ Plant Before you begin the repotting process, getting to know your ZZ plant better is essential. The ZZ plant hails from Eastern Africa, particularly Kenya and northeastern South Africa. Its native habitat offers some insight into the conditions it prefers. Here are a few key points about your ZZ plant: Origin and Natural Conditions The ZZ plant thrives in tropical and subtropical regions. It’s accustomed to dry spells and can tolerate considerable neglect. Common Varieties There are several ZZ plant varieties you might come across: Each has its quirks, including preferences for light and water, so understanding which variety you have is a crucial first step. Ideal Growing Conditions ZZ plants prefer bright, indirect light but can survive in low to moderate light conditions. The most common killer is overwatering rather than under. They can tolerate being dry for a while, so it’s okay to be cautious when watering. Signs It’s Time to Repot ZZ Plant Repotting is moving your plant into a new container with fresh soil. Here are a few indicators that your ZZ plant may be ready for a new home: Root Binding Take a peek at the drainage holes of your current pot. If you see roots poking through or circling the bottom, your ZZ is likely root-bound and in need of more space. Soil Depletion Over time, the soil in your plant’s current pot will lose nutrients and break down. Renewing the potting mix can provide a fresh start for your ZZ. Slow Growth If your ZZ plant is growing slowly and more robustly than it once was, it could be a sign that it’s struggling to find resources in its current environment. Pot Overcrowding Has your ZZ grown to the point where it’s toppling over its pot or becoming unbalanced? It might be time to give it a more stable home. Tools and Materials You’ll Need Gather the following items to prepare for your ZZ plant’s repotting: Choosing a New Pot for ZZ Plant Selecting the right pot is just as important as choosing the suitable soil. The pot should be slightly larger than the current one, usually only one size up, to ensure the plant is manageable with a manageable amount of new space. It is also essential to have proper drainage holes to prevent overwatering. ZZ plants like to dry out between waterings, so standing water in the pot can lead to root rot. Preparing to Repot ZZ Plant Here’s how to prepare for repotting your ZZ plant: The Repoting Process Once you’re ready to repot, follow these steps carefully: Aftercare and Post-Repotting Care To give your ZZ plant the best transition into its new home, follow these aftercare tips: Conclusion Repotting your ZZ plant can be a rewarding experience that gives your plant a new lease on life. Understanding the needs of your specific plant and following these guidelines will help ensure a smooth transition and a happy, healthy ZZ plant for years to come. Remember, patience is key; sometimes, your plant may look a little worse temporarily after repotting, but it should bounce back in no time with proper care and attention. Frequently Asked Questions About ZZ Plant Repotting Can I divide my ZZ plant during repotting? Yes, ZZ plants can be divided during repotting. Make sure each division has a few rhizomes and healthy roots. When should I repot my ZZ plant? Repot your ZZ plant when you notice it has outgrown its current container, usually every 2-3 years in spring or early summer. My ZZ plant has yellow leaves after repotting. What should I do? This could be a sign of shock. Ensure the plant is in a consistent environment and you’re not overwatering. In many cases, the plant will recover independently in its own time. Should I repot ZZ plant if it’s flowering? If your ZZ plant has flowers, repotting can cause stress and may cause them to die. It’s best to wait until they’re finished blooming. What type of potting mix should I use to repot my ZZ plant? Use a well-draining potting mix specifically designed for succulents or cacti, or create your mix using equal parts of potting soil, perlite, and coarse sand. Should I fertilize my ZZ plant after repotting? Wait at least 4-6 weeks before fertilizing your ZZ plant after repotting to allow it to adjust to its new environment. How often should I water my ZZ plant after repotting? Water your ZZ plant sparingly after repotting, allowing the soil to dry out slightly between waterings to prevent overwatering and root rot. How do I encourage new growth after repotting my ZZ plant? Provide your ZZ plant with bright, indirect light, maintain a consistent watering schedule, and avoid over-fertilizing to encourage new growth after repotting. What are some signs that my ZZ plant needs repotting? Signs that your ZZ plant needs repotting include:

The Complete Guide to Repot ZZ Plant Read More »

Zinnia Flower-Tips to Grow Zinnias

5 Best Tips to Grow Zinnias Like a Professional

Zinnias are vibrant and colorful flowers that brighten up any garden with their beauty. These easy-to-grow annuals are popular among gardeners for their versatility and stunning blooms. In this article, we will explore zinnias, their various varieties, the importance of successful zinnia cultivation, and valuable tips to help you grow zinnias like a pro. Zinnias belong to the Asteraceae family and are native to North and South America. They come in a wide range of colors, including red, pink, orange, yellow, and white, making them a favorite choice for adding splashes of color to gardens, borders, and flower beds. Importance of Growing Zinnias Successfully Growing zinnias successfully enhances your garden’s visual appeal and contributes to biodiversity by attracting pollinators like butterflies, bees, and hummingbirds. Zinnias are also excellent cut flowers, perfect for creating vibrant floral arrangements to adorn your home. Selecting the Right Varieties Zinnias come in a diverse array of varieties, each with its unique characteristics and growing requirements. Understanding these varieties and selecting the right ones for your garden is key to successful zinnia cultivation. Overview of Zinnia Varieties Factors to Consider When Choosing Zinnia Varieties Tips to Grow Zinnias 1. Choosing the Right Location The success of your zinnias starts with where you plant them. Zinnias are sun lovers and will thrive in a spot with at least 6 to 8 hours of sunlight daily. It is crucial to choose a location that provides the right conditions. Sunlight Ensure that your zinnias have access to full sun. A sunny location ensures robust growth and vibrant blooms. Zinnias might not be the best fit if your garden space is shaded. Direct morning sunlight is particularly beneficial, as it helps to dry plants after dew or watering, preventing mildew. Soil Type and Drainage Zinnias are not too picky about their soil but prefer it to be well-draining. They can grow in various soil types, but a good, rich, loamy soil will provide optimal growing conditions. Avoid waterlogged areas, as zinnias are susceptible to root rot in consistently wet soil. Sandy soil amended with organic material can be a great option if drainage is an issue. The right location will set the stage for healthy zinnia plants less prone to disease and other stressors. 2. Proper Planting Techniques Planting zinnias correctly is the next step to guaranteeing their growth and survival. Seed Selection Choose high-quality zinnia seeds from a reputable supplier or select healthy, young transplant seedlings with a strong stem and healthy leaves. There are various varieties of zinnias with different growth habits and bloom types, so choose seeds or plants that match your vision for your garden. Spacing Proper spacing is essential to allow your zinnias to grow and spread without competition. Overcrowding can lead to disease and smaller blooms. For most zinnias, space plants about 6 to 24 inches apart depending on the variety and expected height. Depth Plant zinnia seeds about ¼ inch deep in the soil. If transplanting, ensure the root ball is level with the surrounding soil and the plant is not planted too deeply. By planting your zinnias correctly, you set them up for success and good establishment in the garden. 3. Watering and Feeding A good watering and fertilizing regimen is crucial for healthy zinnia plants that produce abundant flowers. Water Requirements Zinnias prefer a moderate amount of water. They can tolerate dry conditions once established but produce more flowers with consistent watering during dry spells. The soil should dry out a bit between watering to avoid over-saturation. Fertilization Schedule Zinnias are light feeders, meaning they don’t require much fertilizer to grow well but benefit from the occasional nutrient boost. Feeding them a balanced fertilizer like a 10-10-10 or a flower-boosting 15-30-15 is good practice. Fertilize them at planting and then once a month throughout the growing season. Too much water or fertilizer can lead to lush, green foliage at the expense of flowers, so follow a strict but gentle regimen. 4. Maintenance and Care Proper maintenance is vital for zinnias to keep blooming and avoid common issues. Pruning Regularly prune zinnias by pinching back the stem tips to encourage bushier, fuller plants. This can be done when the zinnias are about 6 inches tall and then again when side shoots are about 6 inches long. Deadheading Remove spent flowers by deadheading. This keeps your zinnias looking their best and encourages further blooming. Cut the stem down to the next set of leaves or flower buds. Pest Control Watch out for common pests such as aphids, spider mites, and Japanese beetles. Regular monitoring and quick action can prevent these pests from affecting your zinnias. From natural predators to organic insecticidal soaps, there are many ways to control pests in an eco-friendly manner. By diligently maintaining your zinnias, you ensure they look their best while minimizing potential issues. 5. Harvesting and Enjoying Zinnias The payoff for your hard work comes when you can enjoy zinnias in your home. When to Harvest Zinnias are best harvested in the morning. Choose flowers that have just started to open for the most extended vase life. Vase Life Zinnias have a good vase life if adequately harvested and cared for. Change the water every few days and recut the stems at a slant. Add a floral preservative to the water to prolong the blooms. Creative Uses Zinnias can be used for more than just traditional vases. They are perfect for creating bold, colorful arrangements and wreaths. They also work well as dried flowers and can be used in crafts. Extending the Blooming Season of Zinnias: Tips for Continuous Color With their vibrant hues and long-lasting blooms, Zinnias can add a splash of color to any garden. Consider these tips and companion planting ideas to make the most of these beautiful flowers and enjoy a prolonged blooming season. Tips for Prolonging Zinnia Blooms Companion Planting Ideas for Continuous Color By implementing these tips and incorporating companion plants, you can extend the blooming season of zinnias and create

5 Best Tips to Grow Zinnias Like a Professional Read More »

Using essential oils-Ways to Use Essential Oils to Scent a Room

15 Ways to Use Essential Oils to Scent a Room

When transforming a space into a sanctuary of calm or a den of invigoration, the little things often make a big difference. For centuries, essential oils have been the go-to for adding a touch of aromatic charm to our homes. These potent plant extracts are renowned for their therapeutic properties and are the foundation of holistic well-being. But beyond their health merits, essential oils are also the secret ingredient for creating captivating and personalized home fragrances. This post will explore fifteen creative ways to use essential oils to scent a room. From crafting your reed diffuser to blending your signature room spray, these DIY techniques offer a delightful departure from commercial air fresheners. Whether you’re a home enthusiast, DIYer, or wellness seeker, this guide is tailored to bring a dash of aromatic luxury to every corner of your abode. Ways to Use Essential Oils to Scent a Room 1. Electric Heated Diffusers An electric diffuser is a powerhouse for disbursing the scent of essential oils throughout a room. It uses controlled heat (usually from a small light bulb or warming plate) to vaporize the oil, which is then dispersed into the air. Here’s how to get the most out of an electric heated diffuser: Technique Benefits 2. Room Sprays and Mists Creating your room spray is a simple and cost-effective way to personalize your space. With just a few household ingredients, you can have a non-toxic and fragrant spray ready to eliminate odors and uplift moods. Technique Benefits 3. Reed Diffuser A reed diffuser is a simple and elegant way to add a consistent, gentle scent to a room. The natural reeds draw the oils up and release the fragrance, making a reed diffuser a low-maintenance option for continuous scenting. Technique Benefits 4. Unfinished Wood Using unfinished wood as a diffuser is an inventive way to bring a subtle hint of fragrance to a room. This method is perfect for closets, drawers, and small spaces. Technique Benefits 5. Potpourri Potpourri may seem old-fashioned, but it’s a tried and true way to add a natural and continuous fragrance to your home. You can revamp potpourri to suit any theme or season when combined with essential oils. Technique Dried flowers and botanicals are the base of potpourri. Select materials like rose petals, lavender, or cloves that hold scent. Sprinkle your favorite essential oils onto the potpourri and mix thoroughly.  Keep the potpourri in a sealed container to preserve the fragrance when not in use. Benefits 6. Scented Candles with Essential Oils Scented candles are not only a beautiful addition to your home décor, but they also provide a subtle, long-lasting aroma. By making your own with essential oils, you can customize the scent and achieve a level of relaxation tailored to your preferences. DIY Scented Candle Recipe Ingredients Instructions: Unlike paraffin candles, which can release harmful chemicals when burned, soy or beeswax candles are healthier. They provide a slow burn that gently disperses the aroma of the essential oils throughout your room. 7. Wax Melts Infused with Essential Oils Wax melts are an excellent flameless alternative to scented candles, especially for those who need to be mindful of open flames. How to Make Your Wax Melts Ingredients Instructions The warmers gently heat the wax to release the fragrance, creating a safe and effective way to scent your room. Plus, the DIY route ensures you can blend your oils to create a scent unique to your home. 8. Air Freshener Sachets Using Essential Sachets filled with essential oils and dried botanicals are a charming way to add a touch of nature and scent to your closet, drawers, or car. Creating Your Own Air Freshener Sachets Ingredients Instructions Why It Works These sachets offer a subtle, non-intrusive scent that can last for weeks. Not only do they keep your linens and clothing smelling fresh, but they also bring a bit of the outdoors inside. 9. Simmer Pots with Essential Oils Simmer pots are a traditional stove-top method to fill your home with natural fragrance. You can create various scent profiles by mixing and matching essential oils to suit the season or your mood. How to Make a Simmer Pot Ingredients Instructions Simmer pots gently warm the water, releasing its infused vapors into the air. They offer an easy and flexible way to create a pleasant scent throughout your home. 10. Aromatherapy Jewelry Aromatherapy doesn’t have doesn’t confined to your home. With aromatherapy jewelry, you can take the benefits of essential oils into the world. Using Aromatherapy Jewelry Options How It Works Add a few drops of your favorite essential oil to the diffuser, and enjoy the scent throughout the day. Aroma jewelry allows you to carry a personalized fragrance that provides emotional support and stress relief. 11. Scented Cleaning Products Homemade cleaning products are one of the most practical and efficient ways to scent your room with essential oils. Cleaning often involves lingering odors and the right combination of oils can neutralize these while leaving a fresh, therapeutic aroma. What You’ll Need How to Make It This cleaner will leave surfaces sparkling and imparts the health benefits of the oils used, which can range from antibacterial protection (with oils like tea tree) to a stress-relieving clean (with lavender or bergamot).  12. Vacuum Fresheners A freshly vacuumed room is pleasant, but imagine if it also carried a faint scent of mint, eucalyptus, or citrus. Vacuuming up a potent mixture of essential oils and baking soda is a game-changer for those tired of the classic ‘vacuum smell. What You’ll Need How to Refresh the Pouch Beyond the apparent scent infusion, this method also helps to banish stale odors. It provides a mild aromatherapy session as you clean. 13. Ambient Scent with Baking Soda Baking soda is a tried and true method to absorb odors; adding essential oils can have a pleasant lingering effect. The concept is similar to creating carpet freshener for spaces like trash cans, closets, and cupboards. What You’ll Need How to Make

15 Ways to Use Essential Oils to Scent a Room Read More »

zz plant -Plants That Grow Without Sunlight

10 Plants That Grow Without Sunlight

It may sound counterintuitive for plants to thrive without sunlight, the primary energy source through photosynthesis. However, a beautiful group of flora is perfectly content to grow in the shadows, adding vibrancy to even the darkest corners of your home or office. Whether you’re a green-thumbed enthusiast looking to expand your indoor garden or an urban dweller dreaming of a plant-filled oasis, this list is for you. In this comprehensive guide, I’ll introduce ten plant varieties renowned for their resilience in low-light settings. With their lush foliage and air-purifying properties, these plants can turn any dim space into a focal point of natural beauty while being relatively low-maintenance.  Plants That Grow Without Sunlight 1. ZZ Plant The ZZ plant has become increasingly popular due to its ability to thrive in many lighting conditions. Even though it’s often recommended for low-light environments, it can handle more sunlight if needed. ZZ plants have lovely, glossy leaves and a unique growth pattern, making them an excellent choice for those who appreciate plants with a bit of character. They’re also incredibly drought-tolerant, so a little forgetfulness about watering will help them. 2. Peace Lily Peace lilies are popular for low-light conditions thanks to their resilience and air-purifying qualities. These plants aren’t just beautiful; they’re excellent at filtering out harmful toxins like formaldehyde and carbon monoxide from the air. Despite their misleading name, peace lilies aren’t true lilies and are, therefore, safe for homes with pets. They prefer to be kept evenly moist and even signal when they need water by drooping their leaves slightly, making them excellent for those new to plant parenting. 3. Fittonia The colorful Fittonia, sometimes called the nerve plant, is perfect for adding color to your space. It comes in various shades, from white to pink to green, with intricate veins that create a striking pattern. It does well in terrariums or small containers and is relatively easy to care for, liking to be kept moist with higher humidity levels. While it’s less well-known for its air-purifying abilities, its unique look and pattern lend your indoor garden a decorative and vibrant feel. 4. Snake Plant Also known as mother-in-law’s tongue, the snake plant is virtually indestructible. Its tall, pointed leaves that look like, you guessed it, a snake’s tongue come in various shades of green and yellow, adding a splash of color to any room. They’re a top choice for beginners or those who forget about their plants, as they’ll happily survive being watered once every couple of weeks. Moreover, they’re also on the NASA Clean Air Study list for their ability to purify indoor air, especially at night. 5. Pothos One of the most versatile and popular houseplants, the Pothos, also known as Devil’s Ivy, is virtually indestructible. Its heart-shaped leaves come in various colors, from vibrant green to marbled white and neon yellow. Pothos can handle multiple light conditions, including low light, but it’s best to give them some indirect light occasionally to thrive. They’re great for hanging planters or high shelves, where their cascading vines can drape elegantly — keep them out of direct sunlight to avoid scorching their leaves.  6. Spider Plant Spider plants are not only one of the easiest houseplants to grow, but they’re also incredibly prolific, often producing ‘spiders’—or offsets—that can be repotted to create more plants. Their arching leaves and delicate white flowers make for an appealing aesthetic, and they’re known to help reduce airborne allergens. Spider plants prefer a good amount of water, but they’re forgiving if you occasionally miss a watering. They’re also safe for pets and are known to have mild hallucinogenic effects for cats. 7. Parlour Palm The Parlour Palm is a timeless classic for good reason. Not only is it stunning — with its delicate, feathery fronds that resemble a palm tree miniaturized for indoor spaces — it’s also adaptable to various light levels, including low light. These palms prefer consistently moist soil and will add a touch of elegance to any room. It’s often considered a symbol of peace and tranquility, perfect for creating a calm atmosphere in your home. 8. Bromeliad Bromeliads are a family of tropical plants known for their ornamental flowers and striking foliage. The good news is that many of these varieties don’t need full sun to thrive. They’re epiphytes, meaning they can grow on other plants without soil. Just ensure the central cup where they collect water stays filled, and place it in a spot with indirect light. Their unique appearance and relatively small size (compared to some houseplants) make them great for tabletops or as a bold accent in any well-designed living space. 9. Aglaonema The Chinese Evergreen, or Aglaonema, hails from the rainforests of Southeast Asia and is known for its beautiful variegated leaves that can easily tolerate low light. It comes in various shades of green, often with silver or gray markings. This plant also doubles as an air purifier, filtering toxins. Keep its soil evenly moist and watch as it grows new leaves that emerge from the center, gradually giving it a bushy, attractive appearance. 10.Dracaena Dracaena is a striking plant with long, ribbon-like leaves that can grow up to 10 feet tall. It’s available in various colors and varieties, but its ‘marginal’ cultivar is a popular choice for homes. Water occasionally and mist the plant to replicate the tropical conditions it loves. Be aware that Dracaena is toxic to pets if ingested. Alongside its captivating presence, Dracaena is effective at removing toxins like trichloroethylene, formaldehyde, benzene, and more. Final Thoughts Low-light settings don’t have to be devoid of life and color. With the right plants, you can create a soothing and delightful environment that’s as healthy for your body as it is for the soul. Whether you opt for Pothos’s hanging vines or a Bromeliad’s exotic charm, integrating these low-light plants into your home can be a joyful discovery experience, adding a little more life to every square foot. Remember to care for your new

10 Plants That Grow Without Sunlight Read More »

Indoor Plants-Best Indoor Air Purifying Plants

13 Best Indoor Air Purifying Plants

The air inside our homes can sometimes be more polluted than the outside air. This is because of dust, chemicals from cleaning products, and even some types of furniture that can release toxins. Breathing in this polluted air can make us feel sick, cause headaches, or worsen allergies. Indoor plants are incredible natural air purifiers, their leaves and roots absorb toxins, making the air healthier to breathe. These plants can improve our mood, reduce stress, and even help us sleep better. In this article, we will introduce you to the 13 best indoor air purifying plants. These plants are not only great at cleaning the air, but they are also easy to take care of. Best Indoor Air Purifying Plants 1. Peace Lily We start with the Peace Lily, a staple houseplant known for its striking white blooms and air-purifying prowess. Peace Lilies excels at removing ammonia, benzene, formaldehyde, and trichloroethylene – chemicals commonly found in cleaning chemicals and cosmetics. With minimal upkeep and the ability to thrive in low light, the Peace Lily is a popular choice for novice plant parents. The Peace Lily also boasts a knack for alerting you when thirsty, an invaluable trait for a houseplant. When it needs water, the leaves will begin to droop, signaling you to give it a drink. Just be cautious if you have pets – this plant can be harmful if ingested, so it’s best to keep it away from curious cats and dogs. 2. Snake Plant Next on our list is the Snake Plant, also known as ‘Mother-in-Law’s Tongue.’ Renowned for its durability and minimalistic look, it’s a plant that even the most forgetful caretakers can keep happy. This hardy tropical species is excellent at filtering out formaldehyde and benzene, two common household toxins that can have serious health effects. What’s particularly impressive about the Snake Plant is its ability to produce oxygen. Unlike most plants, it does so at night. This makes it ideal for bedrooms, ensuring you breathe clean air around the clock. 3. Spider Plant The Spider Plant is a popular houseplant known for its long, arching green leaves with white stripes. It gets its name because the small baby plants, or “spiderettes,” dangle down from the mother plant, looking like little spiders. Spider Plants are excellent at removing harmful toxins from the air, such as formaldehyde and xylene. These toxins can come from car exhaust, paint, and household cleaning products. Having a Spider Plant in your home can reduce the amount of these toxins in the air. Spider Plants prefer bright, indirect light but can also tolerate lower light conditions. Avoid placing them in direct sunlight, as it can scorch their leaves. Water your Spider Plant when the top inch of soil feels dry. Be careful not to overwater, as this can cause root rot. They like to be kept slightly moist but not soggy. Spider Plants are relatively low-maintenance. Remove any brown leaves and trim the spiderettes if they get too long. You can also repot the plant every few years to keep it healthy. 4. Aloe Vera A household name for its medicinal properties and succulent leaves, Aloe Vera, is much more than a sunburn soother. It’s also an excellent air purifier, specializing in clearing pollutants from harsh chemical cleaning products. With its rosettes of succulent leaves and striking bloom stalks, Aloe Vera’s aesthetic appeal is undeniable. It’s also a cinch to care for – give it plenty of sunshine and don’t overwater. Aloe Vera is a must-have in the kitchen or near the windows –by choosing a sunny spot, you’re ensuring its health and improving the air quality in the heart of the home. 5. Boston Fern Rounding out our top five is the classic Boston Fern, a popular choice for those seeking to add a touch of nature to their homes. These delightful, feathery fronds are experts in cleansing the air by filtering out formaldehyde and xylene – a bonus for allergy sufferers and those sensitive to air quality. Keep your Boston Fern happy with a bit of humidity – a regular misting or placing a tray of water with pebbles underneath for moisture can go a long way. This plant can also thrive in cool temperatures, making it perfect for those colder corners of your home that could do with a splash of green. 6. Rubber Plant Remember those deep, rich green leaves your grandma adored? Those belonged to none other than the rubber plant. This tropical species is an excellent defense against Benzene, a toxin in furniture wax, polishes, and paints. With a good balance of light and water, these low-maintenance leaf clads can grow impressive sizes, making them a statement piece for any room. 7. Areca Palm With its elegant feathery fronds, the Areca Palm is a master at dusting the air. It’s especially effective at removing ammonia, a by-product of excrement and cleaning products. This is why it’s often recommended for pet-friendly homes. Bright but indirect light is its jam, and if you’re kind enough to keep its fronds misted, it’ll humbly wave its thanks. 8. English Ivy If you want an A-list plant that snags airborne fecal particles and reduces mold in the air, the English Ivy is your celeb. This climber loves to trail or climb, giving you creative freedom in home decor. Remember, it’s a natural climber and might need a little trimming not to take over. 9. Bamboo Palm The Bamboo Palm, a native to Mexico and Central America, is a triple threat against toxins. It tackles Trichloroethylene, Benzene, and Formaldehyde—nasties commonly found in window cleaners, soaps, and surface treatments. Give it some light-to-medium shade, and it’ll grow tall and proud. 10. Gerbera Daisy For floral-shaped air purifiers, the Gerbera Daisy can’t be beaten. This beauty is the hero in removing the Benzene emissions from printing materials. It’s more high-maintenance than the others on our list, so if you’re into a bit of a challenge, this could be your green match. 11.

13 Best Indoor Air Purifying Plants Read More »

Scroll to Top